Introduction to React Native
Goals
By the end of this lesson, you will:
- Understand the differences between React and React Native
- Understand how to use an iOS simulator
- Understand the different native components and how to style them
- Know how to debug React Native with warnings, errors, and Chrome debugger
- Be familiar with when to use the different React lifecycle methods for mobile development
Welcome to the world of mobile development. React Native is just like the React you know and love for the web, but it compiles JavaScript to native code (Objective-C, Java) for a specific native OS. So you get the features of native apps while just writing JS! You also get the benefits of reusable components, state management with Redux, and Chrome debugging tools.
Here are some things we already know:
- JavaScript
- React
- Redux
- npm
package.json
What is new is dealing with iOS and Android. For the most part you can write a most of your code that is used by both. But know that there will be differences in some UI components that you use, the process for emulating devices will be different and there will be performance differences between the two (if it runs fast on Android, it should be blazing fast on iOS).
Be aware that there are some drawbacks to using React Native. One is that the Facebook team releases updates every 2 weeks. The code updates consistently and there will be breaking changes in the future. Also, if you have a lot of components to scroll through, a user can gesture fast enough to cause a lag in performance.
That being said, there are huge advantages to using React Native. You can prototype, develop, and deploy mobile apps very quickly using just JS that works natively on iOS and Android. You can use hot-module reload to update your app and instantly see the change without recompiling all of your code. You can also write native code to create custom components or tweak performance and then easily drop them into your React Native code. There are great APIs for animations and gestures to create rich mobile user experiences. All in all, React Native is a fantastic way to jump into mobile development and create useful apps that work across Android and iOS.
Your First React Native Application
First let’s get our dependencies ready for React Native. Watchman is a tool built by Facebook to watch the file system and reload your code on the mobile emulators:
// From the root directory
brew install watchman
npm i -g react-native-cli
Now we are ready to create our first mobile app. We will be building a really simple app that scrolls through a few images and has a couple of UI components that change state. Using the React Native CLI, it’s super easy to get your project up and running. We are going to focus today on just iOS because we don’t need to install or sign up for an iOS emulator - xcode provides us with one. Here are some commands you can use to setup and emulate a React Native app:
# To run in iOS
$ react-native run-ios
# To run in Android, but you'll need to install other tooling to do this
$ react-native run-android
# If you want to pick a specific device on iOS, set it with the simulator flag
$ react-native run-ios --simulator="iPhone 4s"
# To check all the available devices you can run with iOS, run the below code. Pretty awesome that you can emulate iPhones, Ipads, iWatchs, Apple Tv
$ xcrun simctl list devices
Additional Android setup
If you’re interested in emulating your application on an Android device, then follow these instructions to get setup on a free Android emulator
First Time Around the Block
Let’s setup our application. Run these commands in your terminal:
# Create our app
$ react-native init DinoBounce
$ cd DinoBounce
# To run in iOS
# Start another window in your terminal
$ npm start
# In the other terminal window
$ react-native run-ios
The emulator should start, and when your terminal says ** BUILD SUCCEEDED **, your app should load and you will see the boilerplate React Native screen.
A React Native app looks very similar to React apps you’ve seen before. You use render() to display information to the user, pass around props and state, and use the lifecycle components to manage state. The React Native app entry point is the index.js file at the root.
One major change between normal React and React Native is that instead of using HTML elements, we use mobile components - there is no HTML DOM like we think of when developing web apps in the browser. These are native UI components and can vary depending on the platform (iOS or Android). The nice thing is that we still utilize JSX so it really isn’t too big a difference. Here’s a general mapping of the most common native components vs. HTML:
<View /> = <div>
<Text /> = <p><h1><h2><h3><h4><h5><h6>
<TextInput /> = <input type="text">
<Button /> = <button>
<ListView /> = <table>
<Image /> = <img>
But this being mobile, we have to be able to respond to user gestures and navigators. Luckily there are components for that too:
<Navigator /> (also <NavigatorIOS />)
<StatusBar />
<Slider />
<ScrollView />
<Picker /> (also <PickerIOS />)
<Modal />
<Switch />
You can see that IOS tends to have an iOS specific component (…Android does too on some components) because iOS is no fun and doesn’t like you customizing components. You can use <Navigator /> for iOS, but if you are building strictly for Apple products using <NavigatorIOS /> leverages native UIKit navigation.
Part of the entry point file is registering the main application component. To register your app, you have to use AppRegistry.registerComponent.
Let’s dive into some code to check it out. We are going to build out a very simple app that scrolls some dinos. We’ve set you up with images and a basic App component. We will walk through the rest of the code and build it together.
First, there is some boilerplate code in the index.js file, which we won’t change:
import { AppRegistry } from 'react-native';
import App from './App';

AppRegistry.registerComponent('DinoBounce', () => App);
However, we don’t want the boilerplate code in the App.js file. Instead, use this basic “Hello World” code in the App.js:
import React, { Component } from 'react';
import { StyleSheet, Text, View } from 'react-native';

export default class App extends Component {
  render() {
    return (
      <Text style={styles.hello}>Hello World</Text>
    );
  }
}

const styles = StyleSheet.create({
  hello: {
    flex: 1,
    justifyContent: 'center',
    textAlign: 'center',
    top: 200
  }
});
Here we are creating a App component that returns text. What an app! We register our app as BouncingDinos, and pass in the App component - piece of cake. Let’s build out that App component now. It will have some text with a switch that allows you to change our dinos to scroll horizontal vs. vertical.
First, create a directory called app in the root of your project. Then in your App.js file:
import React, { Component } from 'react';
import { StyleSheet, Text, View, Switch } from 'react-native';
import { DinoScroll } from './app/DinoScroll';

export default class App extends Component {

  constructor() {
    super();
    this.state = { horizontalIsOn: false };
  }

  render() {
    return (
      <View style={styles.container}>
        <Text style={styles.header}>Welcome to Bouncing Dinos!</Text>
        <Text>Scroll Horizontal</Text>
        <Switch
          onValueChange={(value) => this.setState({horizontalIsOn: value})}
          style={{marginBottom: 10}}
          value={this.state.horizontalIsOn} />
        <DinoScroll horizontal={this.state.horizontalIsOn} />
      </View>
    );
  }
}

const styles = StyleSheet.create({
    container: {
      flex: 1,
      justifyContent: 'center',
      alignItems: 'center',
      top: 50,
      borderWidth: 25
    },
    header: {
      fontSize: 24,
      fontWeight: '900',
      textAlign: 'center',
      marginBottom: 25
    },
    dinoList: {
      padding: 10
    }
});
Now for the DinoScroll component. We will import ScrollView, which allows a user to scroll on a mobile device kinda like overflow: scroll:
import React, { Component } from 'react';
import { StyleSheet, Image, ScrollView } from 'react-native';

export class DinoScroll extends Component {
  render() {
    const {horizontal} = this.props
    return (
      <ScrollView
        horizontal={horizontal} >
        <Image style={[styles.dino]} source={{uri: 'https://www.newdinosaurs.com/wp-content/uploads/2016/01/42_allosaurus_emily_willoughby.jpg'}} />
        <Image style={[styles.dino]} source={{uri: 'https://www.everythingdinosaur.com/wp-content/uploads/2016/10/Bullyland-Pteranodon-model.jpg'}} />
        <Image style={[styles.dino]} source={{uri: 'https://images-na.ssl-images-amazon.com/images/I/81T1sAImqwL._SX463_.jpg'}} />
        <Image style={[styles.dino]} source={{uri: 'https://target.scene7.com/is/image/Target/23949202?wid=520&hei=520&fmt=pjpeg'}} />
      </ScrollView>
    )
  }
}

const styles = StyleSheet.create({
  dino: {
    padding: 20,
    height: 220,
    width: 250,
    shadowColor: '#000',
    shadowRadius: 5
  }
});
Let’s Talk Styles
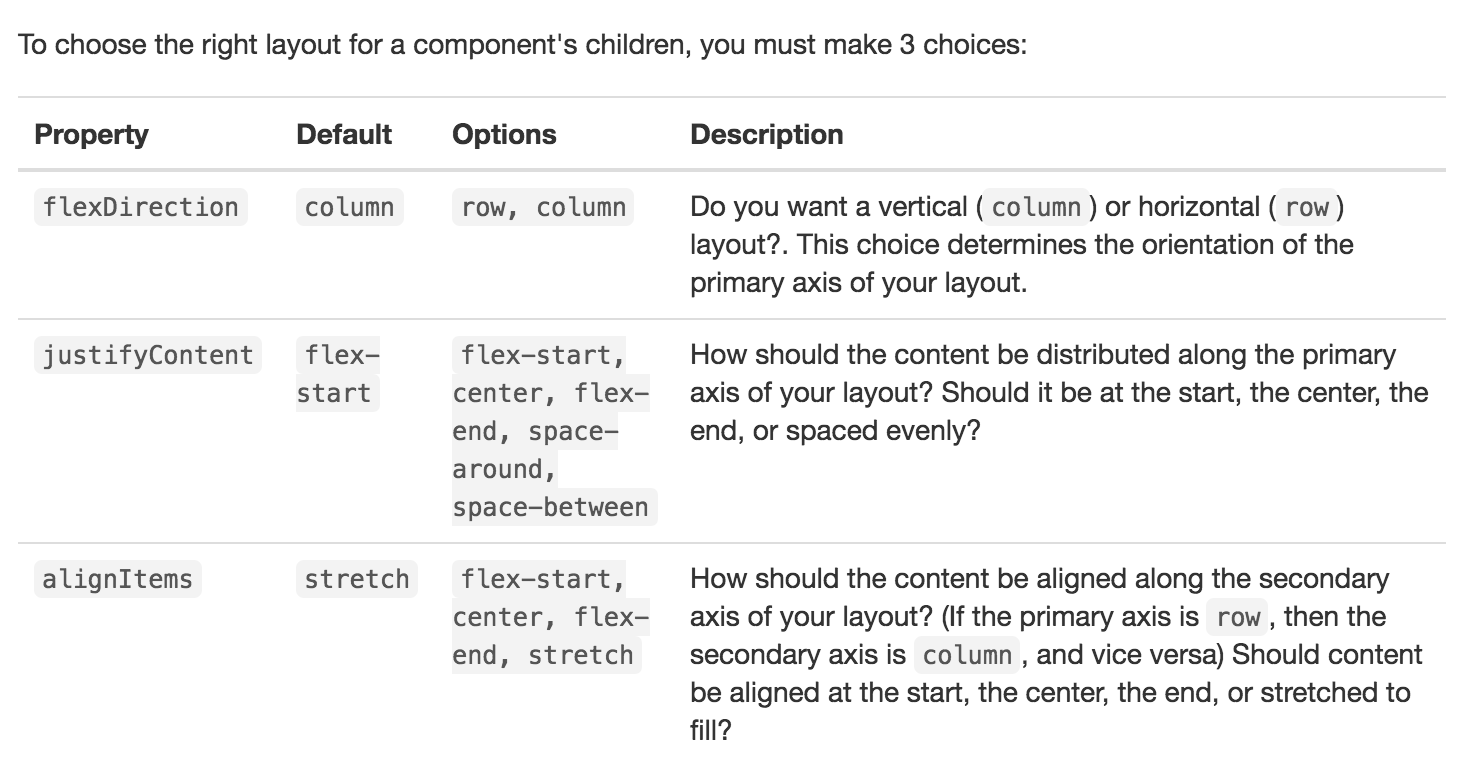
When it comes to styling your app, we don’t write CSS (although it will look very similar). Instead we create a simple JS StyleSheet object and pass specific properties (subcomponents) of the object into components as the style prop. You can pass multiple style props using an array, with the last style taking precedence.
There are a few quirks to be aware of. First, there are no units for size in React Native. WHICH IS AWESOME. No more deciding between pixels and vh and rem and em…just declare a number. React Native also uses flexbox as the default layout. You can also set absolute values like width: 100. Here is a good rule of thumb from React Native Express:
Let’s take a look how this works in our app:
// First we create a StyleSheet object with three subcomponents, container, header and dinoList.
const styles = StyleSheet.create({
    container: {
      flex: 1,
      justifyContent: 'center',
      alignItems: 'center',
      top: 50,
      borderWidth: 25,
    },
    header: {
      fontSize: 24,
      fontWeight: '900',
      textAlign: 'center',
      marginBottom: 25,
    },
    dinoList: {
      padding: 10,
    },
})
Now that we have declared some styles, let’s pass them into our React component’s as a prop.
render() {
  return (
    <View style={styles.container}>
      <Text style={styles.header}>Welcome to Bouncing Dinos!</Text>
      <Text>Scroll Horizontal</Text>
      <Switch
        onValueChange={(value) => this.setState({horizontalIsOn: value})}
        style={{marginBottom: 10}}
        value={this.state.horizontalIsOn} />
      <DinoScroll horizontal={this.state.horizontalIsOn} />
    </View>
  );
}
As you can see in our Switch component, we can also declare styles directly inline. This is helpful when we want to dynamically set style properties such as height or width based on another prop or state value. But what if we want to use multiple style subcomponents? Use an array!
<Text style={[{width: 50},styles.container,styles.header]}>Welcome to Bouncing Dinos!</Text>
It takes a while to get used to writing inline styles and CSS as a JavaScript object on the same file as your JS code. It feels unnatural, and you want to grab for Sass and separate your files. This is mobile, not the web. We don’t have to follow the same rules. I hated it at first, but now I actually prefer it. It makes you focus on each element of a component and not worry about the hierarchy of styles being handed down.
There are ways to abstract out styles and create separate JS files where you export styles. This is handy when you need different styles based on the platform. Read this article from WillowTree to get an idea of how to do that.
Let’s Talk Abstracting Away the Platform
You can write most of your code platform-agnostic but then use the ios or android extensions on certain files to deal only with platform specific differences.
The duality of mobile development is annoying. Thankfully, we can abstract away the constant battle of index.android.js vs. index.ios.js. Let’s do that in our app by creating an App.js component that is consumed by both files.
Let’s Talk Debugging
As we all know, we are no longer in a browser where we can throw debuggers and console.log()s to our heart’s desire. But thankfully React Native gives us a couple of tools to make debugging like the good old times. First, you can throw a console.error('whatever') in your React Native code and redbox (not the movie rental but an error messaging feature) will throw up a red screen with whatever you put in console.error().
An even better feature is the ability to turn on remote debugging through Chrome. With your ioS emulator running, click cmd+control+z to pull up the dev tools. Select Debug JS Remotely and a web browser pointed at http://localhost:8081/debugger-ui will open. Open up the console and select the Pause on Exceptions button. Then throw a debugger in your JS and reload the emulator. The debugger should trigger like a normal debugger and you can inspect this.props …etc.
A Refresher in the React Component Lifecycle
Just like normal React, we have access to the component lifecycle API. Here is a quick rundown of how each method is utilized for mobile:
Mounting Cycle
- constructor(props) - Instantiate the component class and pass in props from the parent component (or container). Can also set local state in the component.
- componentWillMount() - Invoked just once, right before component renders.
- render() - Renders a React component or null.
- componentDidMount() - Invoked just once right after component renders. Good time to make API call or execute delayed code.
Updating Cycle
- componentWillReceiveProps(nextProps) - Parent of component has passed in new props. This component will now re-render. Good time to set local state before the re-render (if necessary)
- shouldComponentUpdate(nextProps, nextState) - Returns either true or false. Defaults to true. If true, the component will re-render. If false, the component will not re-render. Usually used by comparing current props to passed in props.
- componentWillUpdate(nextProps, nextState) - Called once the component decides it will re-render. Can’t set local state here.
- render() - Renders a React component or null if shouldComponentUpdate returns true.
- componentDidUpdate(prevProps, prevState) - Invoked right after component re-renders.
Go Forth and Mobilize
In our next few lessons we will learn how to navigate and add scenes within our mobile apps, how to use animations for an immersive user experience, what ImmutableJS is and how to implement it with Redux.