Introduction to Service Workers
Goals
By the end of this lesson, you will:
- Understand when and why to use service workers
- Be able to implement service workers for making an application available offline
The Offline Problem
Web developers have long been thinking about how to create applications that behave more like native apps. By native apps, we mean applications that you install or download onto your devices (cell phones, tablets, etc.) This goal has had a huge impact on the types of web APIs that are being proposed and the way they’re being developed.
One important difference between native apps and web apps is that native apps almost always provide some sort of “offline experience”. Even if there is no internet connection, the application shell will still load along with some data (perhaps from the last time you opened the application). Though the experience doesn’t provide you with the most up-to-date information, it still brings you back to a familiar state (which is arguably better than a blank screen).
Enter Service Workers
In order to provide this same offline experience for web apps, we needed a new API that would allow us to cache certain assets for offline use. This is where service workers come in.
A service worker is a javascript file that runs in the background of your application and can listen for and intercept network requests.
You can think of a service worker as a proxy that stands between the client and server to determine how to handle any network requests that come in.
What are Service Workers?
The service worker is a relatively new API that allows developers to run a script in the background of their application. With a service worker script being run in the background, we can add new features to our applications that help create better offline experiences for users. For example, a service worker could implement push notifications or background data synchronization - features that were once previously limited to native apps. A service worker script also gives us the ability to intercept network requests and determine how to handle them. This is useful for when we want to serve assets from a cache when a user is offline.
Web Workers
Recall that client-side JavaScript is, by default, single-threaded. Multiple scripts cannot run simultaneously, unless we leverage a Web Workers. Web workers are a way to provide concurrency in JavaScript by allowing a worker script to run in its own thread, separate from the rest of the code associated with the application.
When we mentioned earlier that a service worker script runs in the ‘background’ of our application, what we really mean is that a service worker is a type of web worker. This is the key to many of the offline capabilities we can provide when using a service worker.
While this aspect of service workers provides us with great flexibility, it also requires us to change the way we think about how a script communicates with our application. A worker script cannot directly interact with the DOM like we are used to. Instead, service workers can communicate with the pages it controls by responding to events and messages.
Practice
We’ll create a simple offline news application that uses a service worker to serve up a “shell” of HTML and CSS for our app.
Getting Started
Follow along by cloning the offline-news application and checking out the ‘begin_offline’ branch.
Registering a Service Worker
The first thing we want to do is make sure all of our assets necessary for rendering the page are available offline. This requires a couple of steps.
Add the following code in the JavaScript file called script.js in your root directory:
if ('serviceWorker' in navigator) {
  window.addEventListener('load', () => {
    navigator.serviceWorker.register('./service-worker.js')
      .then(registration => {
        // Registration was successful
        console.log('ServiceWorker registration successful');
      }).catch(err => {
        // registration failed :(
        console.log(`ServiceWorker registration failed: ${err}`);
      });
  });
}
Our registration code starts with some feature detection, by checking if serviceWorker actually exists in navigator. Assuming we’re using a modern browser that supports service workers, we should then be able to register our worker on page load with navigator.serviceWorker.register(). This method takes a single parameter - the path to a javascript file that represents your service worker (we will create this file in a moment), and returns a promise.
Now let’s create that service worker script that we referenced in our registration code.
Create a service-worker.js file in the root of your application.
For now, let’s just add a service worker that will log to the console once it’s been installed:
self.addEventListener('install', function(event) {
  console.log('Service Worker Installed!');
});
Notice the self object in our service worker script. This is how you reference the instance of the service worker itself. You can think of it as being similar to your this context. Using our self object, we are adding a listener for the install event of our service worker. This is one of the phases of a service worker’s lifecycle. It’s important to understand the lifecycle of a service worker so you can better predict its behavior in different circumstances.
Lifecycle of a Service Worker
- Registration - browser is aware that we have a service worker that needs to be recognized, and will kick off the installation step upon a successful registration
- Installation - the service worker is installed, but doesn’t actually control anything on the page just yet. This is a good phase to cache assets for offline use.
- Activation - the service worker has been installed and is activated. This is a good place for us to manage old cached assets and update the service worker.
- Full Page Control - the service worker has been activated and now has full control over any pages that fall under its scope
Inspecting a Service Worker
First things first let’s work from the Incognito Window for the rest of this lesson. Just trust me on this one. It’ll be easier.
If we actually boot up our application:
python -m SimpleHTTPServer 3000
Note: what does this command do?
we see the HTML and CSS at localhost:3000. We can check up on our service worker by clicking on the ‘Application’ tab of dev tools, and selecting ‘Service Workers’ in the left panel:
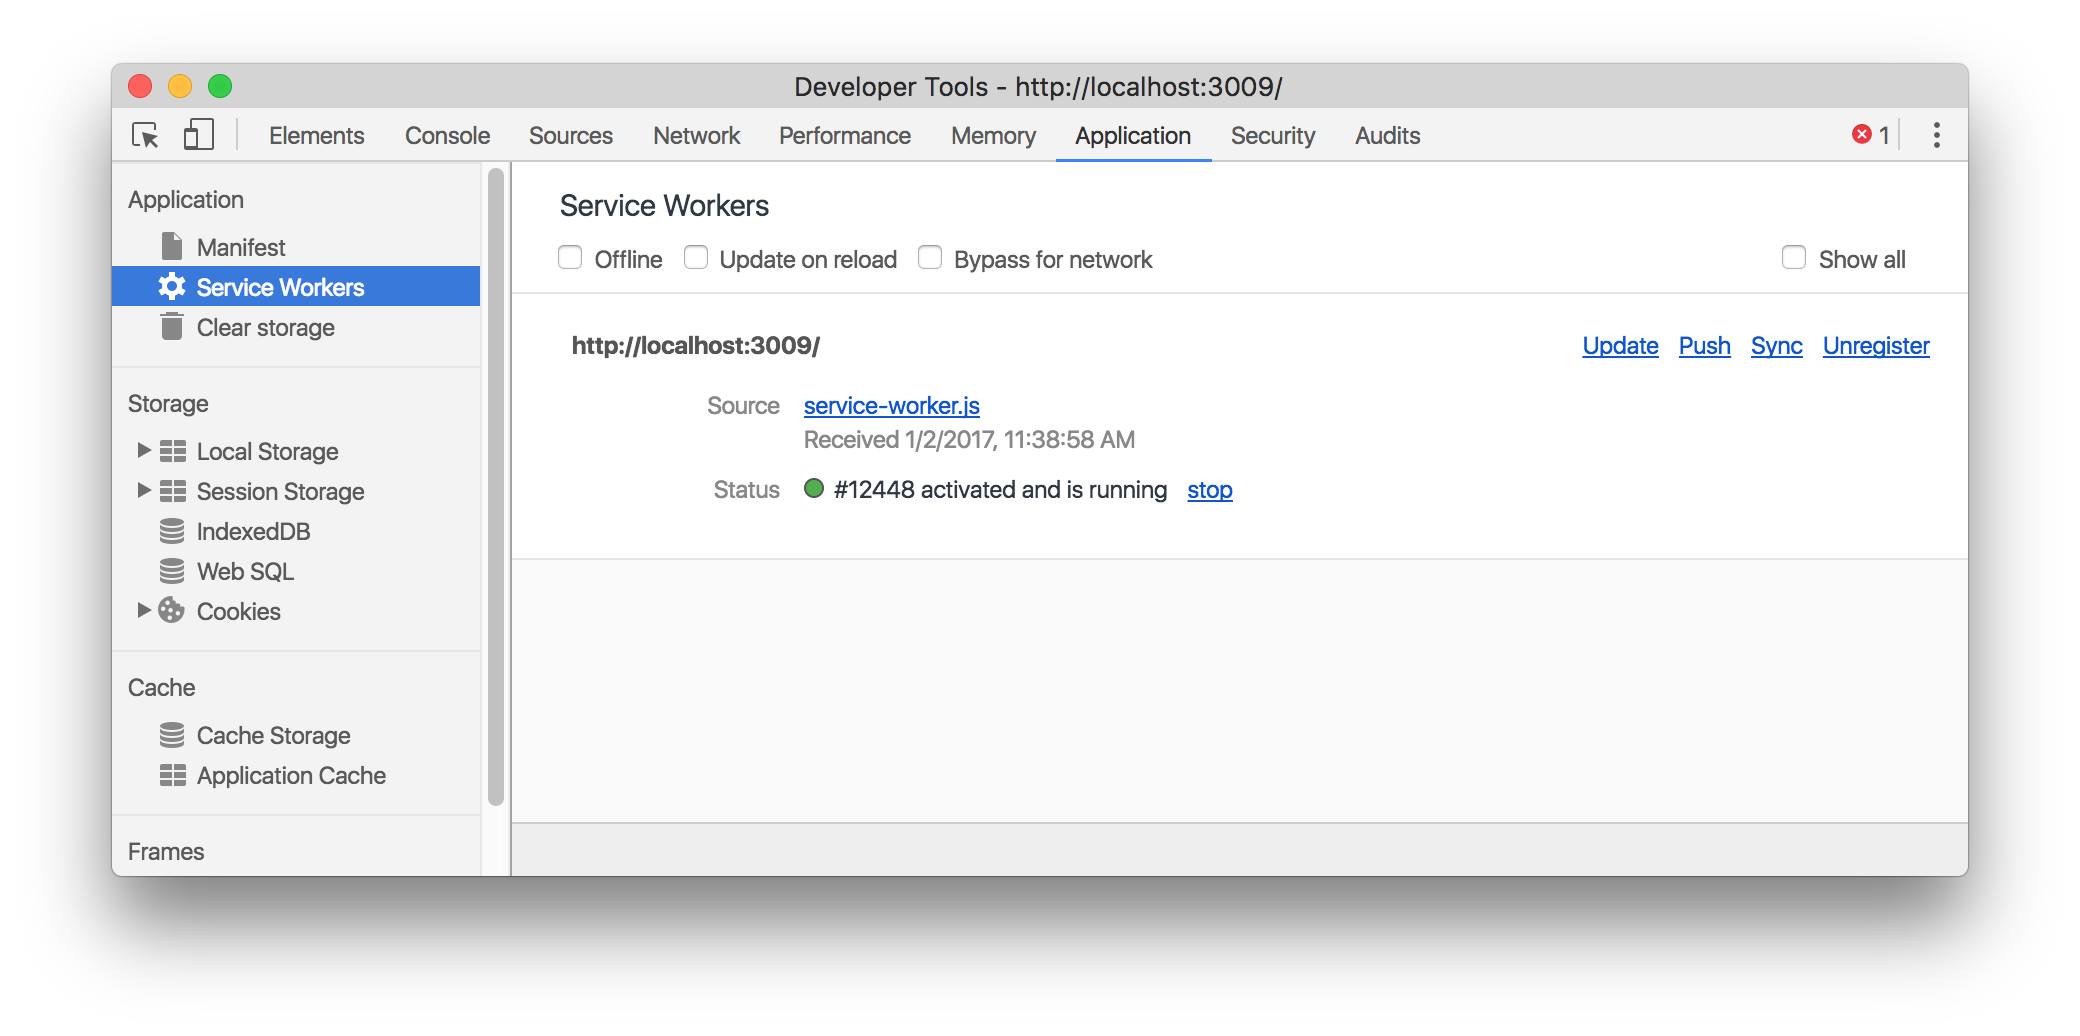
This panel gives us a lot of handy tools for debugging our service worker. Most importantly, we can simulate being offline by selecting the ‘offline’ checkbox. If we select this and refresh our application, we’ll see we get an error that we’re offline and nothing will load.
This is because we haven’t actually told our service worker that we want to cache assets for offline use. Let’s update our service worker to do that now.
Serving Assets Offline
Before we add some assets to serve offline, shut down your local server and refresh your application. You should notice that nothing loads. We get an error that nothing exists at our localhost endpoint. We can solve this by adjusting the code in our service worker file. Remember we said the installation phase of the worker’s lifecycle was a good time to add assets to our cache. Update your service worker with the following:
self.addEventListener('install', event => {
  event.waitUntil(
    caches.open('assets-v1').then(cache => {
      return cache.addAll([
        '/index.html',
        '/css/app.css',
        '/lib/markdown-it.min.js'
      ])
    })
  );
});
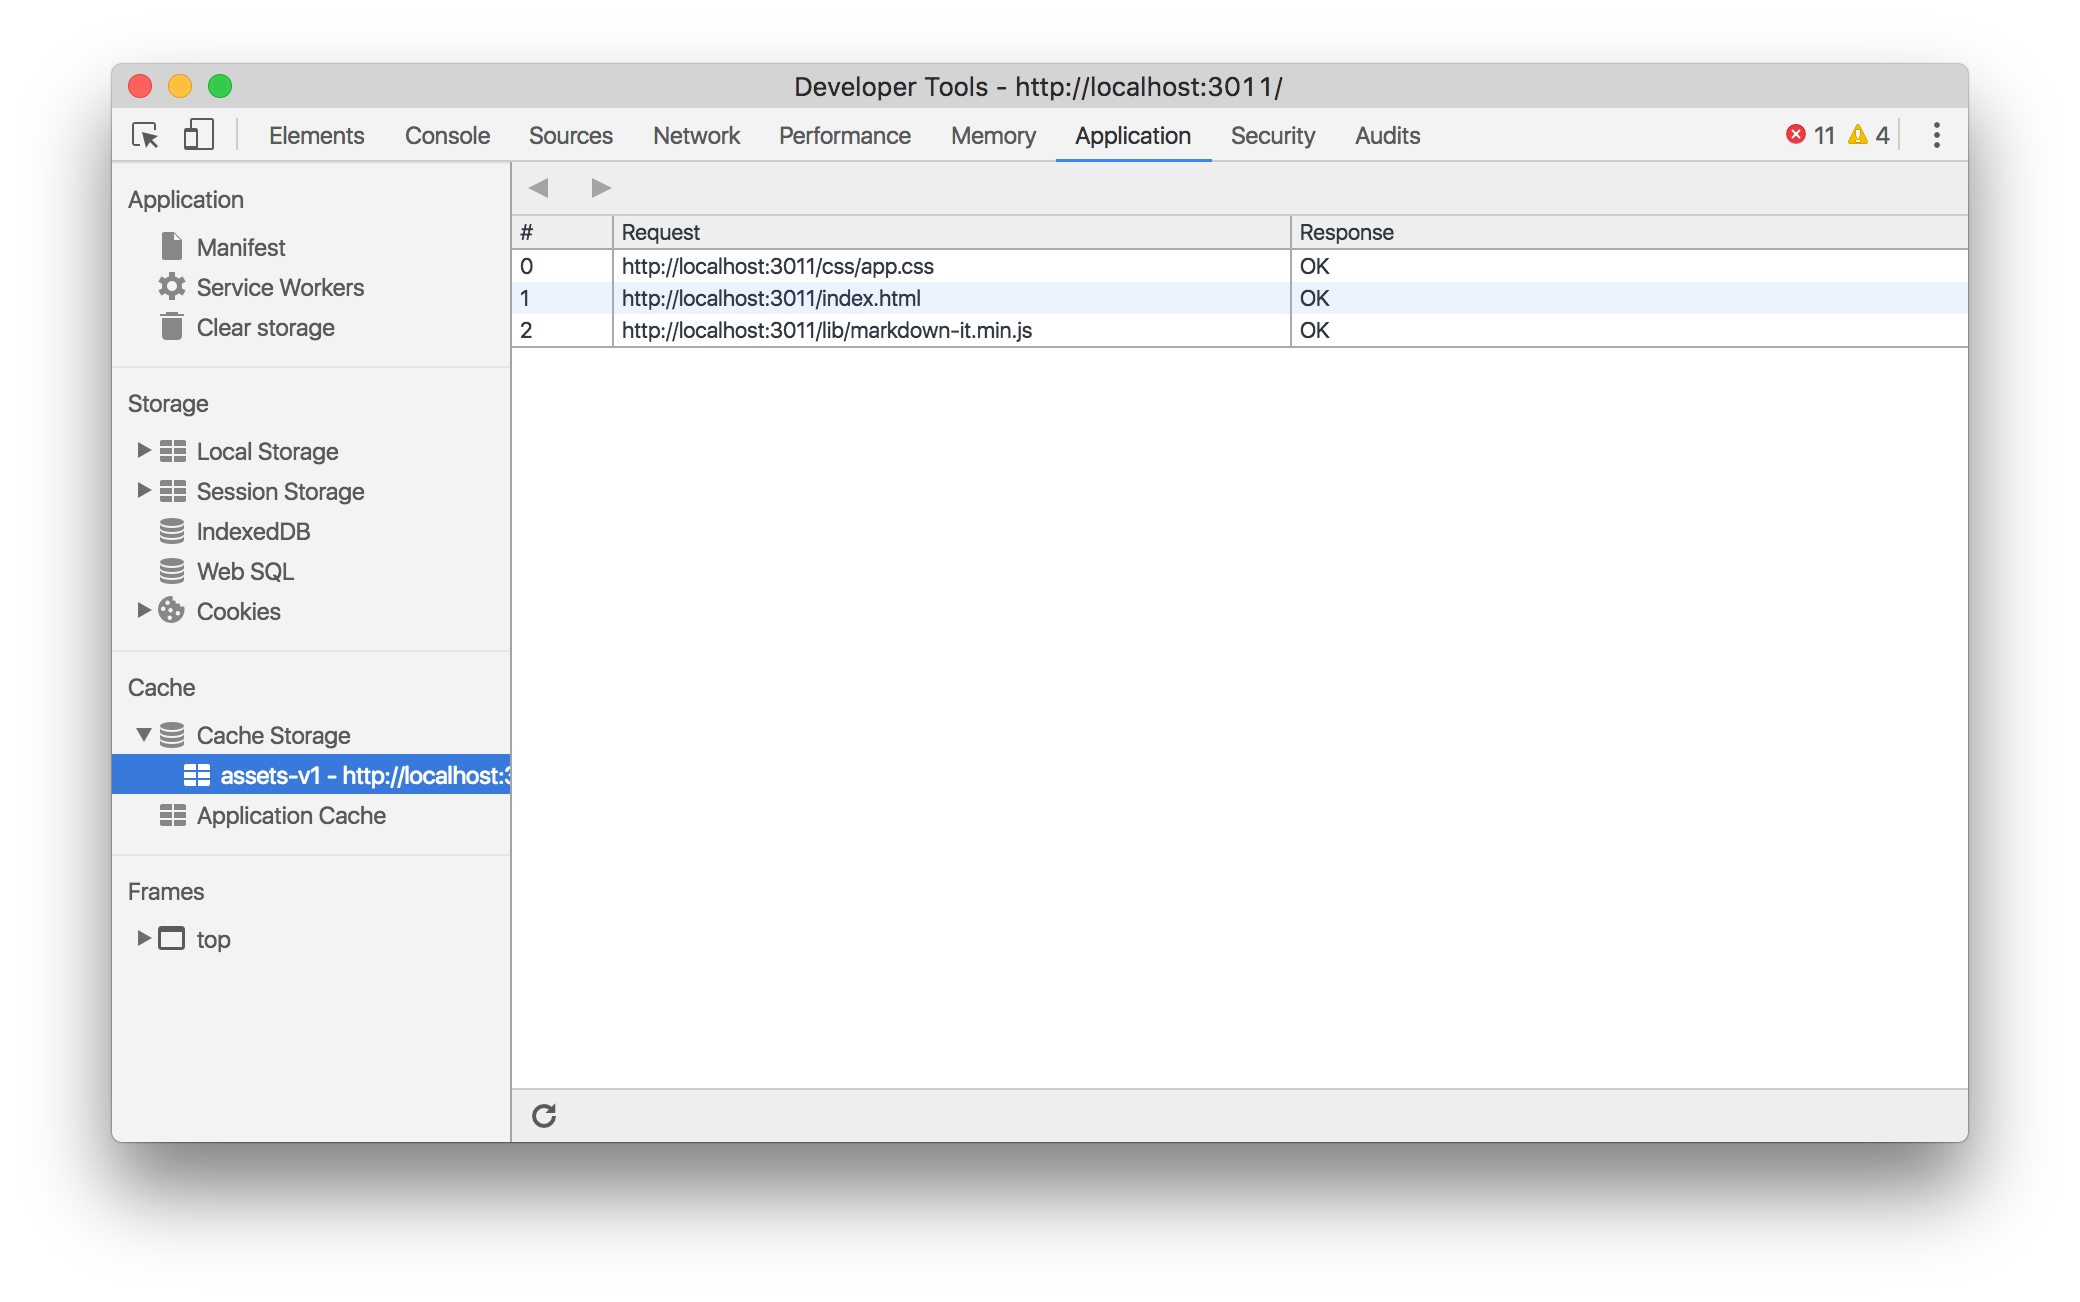
With these changes, we’re telling our service worker that upon installation, we want to create a new cache of assets. Service workers use the CacheStorage API as its underlying method for storage, which you’ll learn about more in an upcoming lesson. For now, just know that we have access to a caches variable that allows us to open a new cache. This cache will have a name (in our case, assets-v1), and upon opening, we can specify a list of files we’d like to add to this cache. Here, we are adding our index page, css and markdown library to make them available offline.
Next, we have to tell our service worker to intercept any network requests to these files so that it can serve them through the cache we just created, rather than trying to find them online:
self.addEventListener('fetch', event => {
  event.respondWith(
    caches.match(event.request).then(response => {
      return response || fetch(event.request);
    })
  );
});
You’ll often hear that service workers are event-based web workers. This means our service worker is going to respond and communicate explicitly through events. In this code, we are adding a listener for any fetch events, and checking to see if they exist in our cache with caches.match(). If it finds a match, it will return the asset right away. If it doesn’t, it will go ahead and fetch it from the server. You can think of a service worker as a proxy for network requests.
Now if you refresh your application and reselect the ‘offline’ box, you’ll see that our app loads and works even when we’re offline. You can also completely shut down your python server in the command line and you’ll still be able to see and use your app. In the ‘Application’ panel of dev tools, you’ll see an option for ‘CacheStorage’ in the left sidebar. If you navigate to this tab, you’ll see all of the assets you just stored for offline use. This is where your service worker is pulling the files from, rather than making additional network requests: